By: Julio Perera on June 24th, 2024
MAS deployment series: Configuring MAS Certificates using a local CA issuer
This is a continuation of our series of blogs about deployment of MAS. In this case, we are going to describe how to configure Automatic Certificate Management via the JetStack Cert Manager or the IBM Cert Manager Operators. Installing either is not part of this Blog Entry and the IBM Cert Manager should come automatically with the MAS Core as a dependency; however, we prefer to use the JetStack Cert Manager as it supports wider use cases than the IBM Cert Manager (such as split horizon DNS setups). We should be also aware of that IBM has officially supported the IBM Cert Manager and made statements that they will support other Cert Managers (RedHat’s or JetStack). In our experience, the JetStack Cert Manager works well with the MAS Core (and applications) up to the latest version at the time of writing 8.11.10.
The main documentation URL where the CA configuration can be found for Cert Manager is https://cert-manager.io/docs/configuration/ca/.
There are some considerations to having Certificates automatically issued and maintained (i.e. re-issued before they expire) with Cert Manager, and in our case; Cert Manager supports using a Certification Authority certificate to issue and renew its own Certificates (from the provided CA Certificate). Applicable considerations are being described below:
- Typically, the CA is a private Certification Authority whose CA “root” certificate is being provided to workstations and servers that belong to the Company or Domain in such a way that for all intents and purposes, the certificates issued by delegates of such CA are valid for these “client” computers. In Windows, the CA “root” Certificate is commonly distributed through an automated Group Policy delivery mechanism.
- We do not recommend delivering the “root” CA Certificate and Private Key to Cert Manager so it can issue Certificates for the Domain. Instead, we should create an “Intermediate CA” with its own Private Key and having the “CA” flag set to “true” (so it must be a CA certificate on itself). To accomplish that using a Windows Server Certification Authority, we can use the “Subordinate Certification Authority” template to generate the “Intermediate CA” Certificate and the Private Key must be known as well. That will allow the issued “Intermediate CA” to be revoked in case such a measure is needed in the future (i.e. is compromised, etc.) without the need of retiring and re-distributing the “root” Certificate which should be very impactful.
- We are going to use a Windows Domain and Certification Authority as our example below. Other options are of course possible, depending on implementation, but given that most companies just use the Windows CA, that should cover the most common cases.
First, we need to have a computer with the “OpenSSL” software installed. This can be the same Windows Server or another computer as we are going to use it just to generate a Certificate Signing Request and Private Key. The result should be that the command line utility “openssl” should be available to be used.
Given that our testing domain for which we have the Certification Authority is named “jcpr.info”, then all exampled below will refer to it, and it should be suitable replaced for the actual domain (and in some cases, the subdomains) to be used.
Then, we are going to generate a Private Key file for our Intermediate CA certificate, to do so, we can use:
openssl genrsa -out mas.jcpr.info.key 2048
Which in our case, generated the file named “mas.jcpr.info.key” with the Private Key as contents. Notice that in our case, the Key is intended to generate certificates for the “mas.jcpr.info” sub-domain although the Intermediate Certificate can be used to generate for anything inside the “jcpr.info” domain (not only inside the “mas.jcpr.info” sub-domain).
The contents of the generated file should be like what is being shown below (this is not the actual Private Key we generated, just another Key generated as an example):
-----BEGIN PRIVATE KEY-----MIIEvQIBADANBgkqhkiG9w0BAQEFAASCBKcwggSjAgEAAoIBAQC9vX3xPuzkSM+l
DgGv4LME55/LyXghd1LLS905A6PRhLsmkNOYGLM86+I5cXw2mzM51wx+/NLhJhhv
DVdiPiEyZaa74bE2v24MwvSgWZz8cvcxBuWPmBEjElZA/e5VqIUi+NdFsSE/IOrL
7WJT41tzpB1kNG58Pjf+FWOiHi4GOomNZlly26Go8UrK9CG0OBpvcsBxpPTn7Y/7
I8INUx+vJe7uQ4DqcUbshi34Ith8jHTj/1AJHPYhIxFRjFES7cN4bA2Hv1UcGTMF
kG5kUr1A0JA2IQf6M+JngDZKfThCO6aK3ps4FsNpvUzkrO/zq2QyrcgmdCnjgFcW
ftGDFnW/AgMBAAECggEAHU4JB5uaZt/AAlQZepqPy7AihA0H2tNdHD0JW+buBEwl
w50WsSUPeddMx2Z5ss1hqgtGyM4vm8qQd4Zt+qRx6CC/EcGX50bFrn7l3WY50tvG
xfG0vurTqsEIRV1y1BQFDBO22/KxmdhxqzFswFwbIc81IubeMZ5Cc6HGE6Hppdhc
lUh5aSA+G0JcNR44gYnFvHcBLhEdeea14NWvfowtnCmqob6heJ4ORyvKvxfWoPt1
vqcL4NX8cTTqzD88WqzJlyeHEXuEyZf4ho1CmKjbMlv6hUsrYnkpvPTyGrRw3K4F
j2u8S5VnP5aNZDAaUHDkVEt8ns+a+L7oOTVY7dIWIQKBgQDeYuuAlRle2HwQZOdf
Bg8VnzG1B7DvEAJAhMeWw734TMwouCapYG23h7TvwmBCFh6MNhfpUvo2rdI7Q6lJ
zcndMC5WD02v5Putn1l+PfxGH63Hpbjw2YtxNlRHvnq+4g4Trscppf7DNfkklORy
LxwmRq1cGE0oV4FuJHuHE9/AOQKBgQDaa1nZe7zrKq+dQDP4wm/aa0WbJLKhdhZP
ug0Mk+WthXk3ezpAHOsoEpFb4Tinrb+7zzfQiKpHFWZIfm7TBSyxumDdvHaLiqi4
4SLtxj5+ITUSe+2pn+kh4AT0xwau9xhSojElnMY84GkiUvuROn0DNzkaNGMnk4kg
4xoMsZp1twKBgQCDqA6CVkLp2sJANmyf3gdqJpAX+5CtR03+Al3jDMlXyaeIZ9VD
qznpUKc21l2EYnH9Ujz/vkcxveBbg6gicHmUwGR+QJseijLRzCgATBQhM7n/G0aN
GE2sXZyxyLwEa/Inhu6T4pkb2sU/+gHw86D3rBoQDrcHLh8LJQAYrRRnSQKBgBqd
jjtUOrclYnT1B+A+QUcKX1cCZ8oJC7r3XvOzaf91DkpWd8isPXOKn6/kh/TW1VBb
dd+xZ5512xrmXTbVoJafsYITnxZt9RViSdFToPXZsg/ojhNnaw83ryLsxcG4Vnxr
SzXcHsP4TJdkKUePKwCjUBADZjnCXqllQx1c3weNAoGAdUtBWZn6WZNrjsj/wXW5
S9K2AQelHLRunu6mtVFVlqK80OeZO3bFJ8YzjUWjJ93PzzKflZpyjKpqVghjqHGR
PqjEoz92tIZ3oZQ/IfT3epFG3YKIFe2a3ZAaKX18pZuP5cdf6/V31q4t0oyR0NMV
jWy5J6Hq4t3T/UqAJ+Bxt3k=
-----END PRIVATE KEY-----
Next, we are going to create the Certificate Signing Request with the above Private Key; to do so, we used the following command:
openssl req -new -key mas.jcpr.info.key -out mas.jcpr.info.csr
To which OpenSSL asked a series of questions that are not that important but should be replaced with your own pertinent information, see below for an example (our answers highlighted in bold):
You are about to be asked to enter information that will be incorporated into your certificate request.
What you are about to enter is what is called a Distinguished Name or a DN.
There are quite a few fields but you can leave some blank
For some fields there will be a default value,
If you enter '.', the field will be left blank.
-----
Country Name (2 letter code) [XX]:US
State or Province Name (full name) []:Florida
Locality Name (eg, city) [Default City]:Hollywood
Organization Name (eg, company) [Default Company Ltd]:jcpr.info
Organizational Unit Name (eg, section) []:
Common Name (eg, your name or your server's hostname) []:mas.jcpr.info
Email Address []:administrator@jcpr.info
Please enter the following 'extra' attributes
to be sent with your certificate request
A challenge password []:
An optional company name []:
That will create a file named “mas.jcpr.info.csr” with contents like the following example:
-----BEGIN CERTIFICATE REQUEST-----MIICzTCCAbUCAQAwgYcxCzAJBgNVBAYTAlVTMRAwDgYDVQQIDAdGbG9yaWRhMRIw
EAYDVQQHDAlIb2xseXdvb2QxEjAQBgNVBAoMCWpjcHIuaW5mbzEWMBQGA1UEAwwN
bWFzLmpjcHIuaW5mbzEmMCQGCSqGSIb3DQEJARYXYWRtaW5pc3RyYXRvckBqY3By
LmluZm8wggEiMA0GCSqGSIb3DQEBAQUAA4IBDwAwggEKAoIBAQCw3BaIFrdVvAde
4UMXBmBzEzZx/CVKxq7lBK3OQxCpi52A9N/icp0apRW2yg4iqrM6teh6hed3cuih
xA0xXbQFV4KdQvn3vg9oq/zq5IEzv8tFT676rQbNdN6yGF49gaoFZTpI1e0ezy9f
NThajKt8PXWMTKrrBEmDsfo+KudaPylGi1khlDPwcSS4vx5L5JdBpRucpZFllC1L
4dcWg1Ypt96rltzvUjaPfc0qzZiEuDVWg1679OemNfsz2zrUtqEW4P0sJ7fBYI92
zW2ylT1ON11yKhyO5Nx7BIdZ2i817LIvuMX1uSTXZ7xzrr3RiaKlGd4llkyqtahx
MkESmkg5AgMBAAGgADANBgkqhkiG9w0BAQsFAAOCAQEAYFaQKb2PYbzuevbocCrP
HPBzpbSeBQRbZCU7LvruskPPXTiFbbWh7yrb0O6FIh6/lp7xO+V9LacdmTc25gtL
8NNb0gtCiL7m6+oVkL8eF6gJghX73FlIFDkk+7caSxXIhnoJsb5/nQBVe69Zluef
+UE1c1/yD7maF/spzWrJJO3y/BvbA60yjsH03MXN4Xm+Pk+lPpV+pKOZzTsAne9Q
rYPxud14x/73H8QIOLFlns+pw0fVcGvPp0SQt55Bog0j+sLpJYUW2/RMbYjnTl9G
ZO7p2Pd1KoRUWkaIRtkU6Sip5SijrQ1tWnJWtOe/Lqw1mTidZmxdQnOqMbxV9rKZ
7Q==
-----END CERTIFICATE REQUEST-----
Next, we shall create an “extension” file with the additional properties we would like to have for our certificate, in our case, with the following contents:
authorityKeyIdentifier=keyid,issuer
basicConstraints=CA:TRUE
keyUsage = keyCertSign, cRLSign, digitalSignature
Note the above may be modified if there is knowledge about what it means and how to modify it accordingly. Otherwise, just leave it as stated.
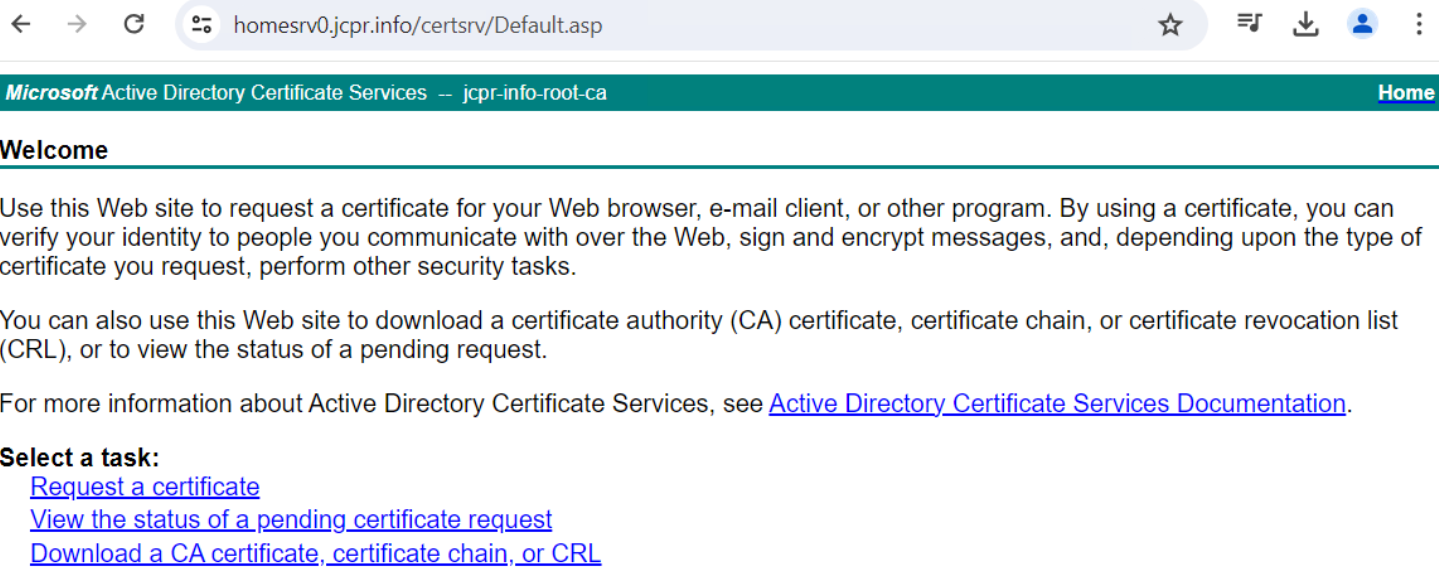
After the above, we need to create an “Intermediate CA” Certificate with the “CA” flag raised using our Windows Certification Authority, to do so, we need to first have the IIS “CertSrv” feature installed and configured. Doing so is not part of the present article. See below for an example on how such feature should be visible in a browser when navigating to https://<your-dc-or-ca>/certsrv and logging as a user with privileges enough to do all the operations (we are logged-in as the Domain Administrator “administrator” in our own testing environment as per below).
Notice that the validity period for the issued Intermediate Certificate is by default 2 years. In case of wanting to use a greater validity period, we can modify the “Subordinate Certification Authority” template which will not be described as part of this post.
Therefore, we are going to “Request a certificate” by clicking in the link as per the below screenshot.
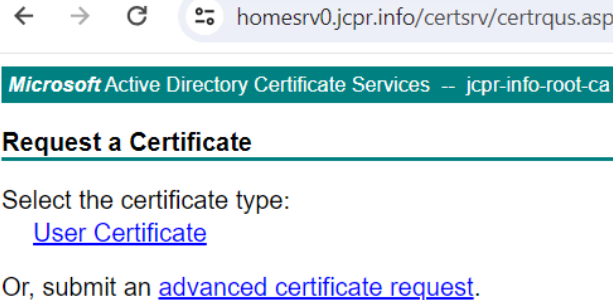
Next, we clicked on “advanced certificate request”:
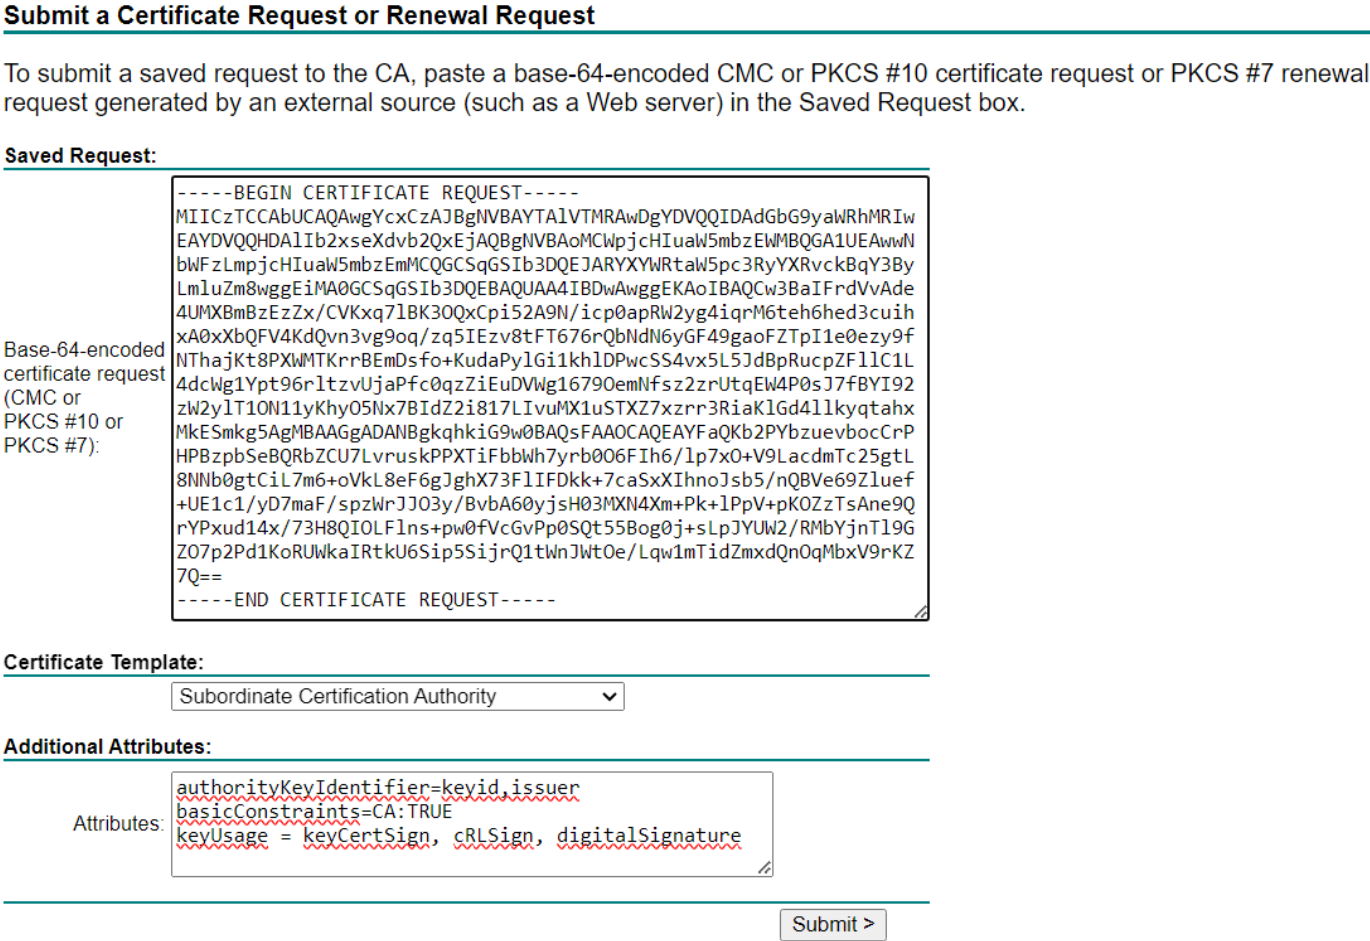
And entered the CSR and “extension”/additional atttributes as shown in the below screenshot:
Next, click <Submit> to submit the request to the CA and we got the following page as a result:
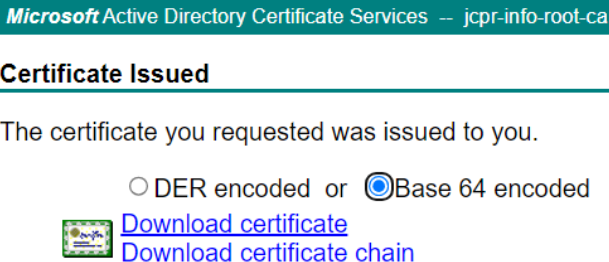
We proceed to choose the “Base 64 encoded” format then click the “Download certificate” link which downloaded a file named “newcert.cer” into our “Downloads” folder. We promptly renamed the file to “mas.jcpr.info.cer” and the contents are being shown below:
-----BEGIN CERTIFICATE-----MIIFdDCCBFygAwIBAgITFQAAABzOkGPz7AqWDQABAAAAHDANBgkqhkiG9w0BAQsF
ADBIMRQwEgYKCZImiZPyLGQBGRYEaW5mbzEUMBIGCgmSJomT8ixkARkWBGpjcHIx
GjAYBgNVBAMTEWpjcHItaW5mby1yb290LWNhMB4XDTI0MDYxNzE4NTk0OFoXDTI2
MDYxNzE5MDk0OFowgYcxCzAJBgNVBAYTAlVTMRAwDgYDVQQIEwdGbG9yaWRhMRIw
EAYDVQQHEwlIb2xseXdvb2QxEjAQBgNVBAoTCWpjcHIuaW5mbzEWMBQGA1UEAxMN
bWFzLmpjcHIuaW5mbzEmMCQGCSqGSIb3DQEJARYXYWRtaW5pc3RyYXRvckBqY3By
LmluZm8wggEiMA0GCSqGSIb3DQEBAQUAA4IBDwAwggEKAoIBAQCw3BaIFrdVvAde
4UMXBmBzEzZx/CVKxq7lBK3OQxCpi52A9N/icp0apRW2yg4iqrM6teh6hed3cuih
xA0xXbQFV4KdQvn3vg9oq/zq5IEzv8tFT676rQbNdN6yGF49gaoFZTpI1e0ezy9f
NThajKt8PXWMTKrrBEmDsfo+KudaPylGi1khlDPwcSS4vx5L5JdBpRucpZFllC1L
4dcWg1Ypt96rltzvUjaPfc0qzZiEuDVWg1679OemNfsz2zrUtqEW4P0sJ7fBYI92
zW2ylT1ON11yKhyO5Nx7BIdZ2i817LIvuMX1uSTXZ7xzrr3RiaKlGd4llkyqtahx
MkESmkg5AgMBAAGjggIVMIICETAdBgNVHQ4EFgQUvT78CAc+I7ltFCHBgjerwHVF
aHQwHwYDVR0jBBgwFoAUQhTv+uL3k2HXwnVW3EVT8zsOf+kwgc4GA1UdHwSBxjCB
wzCBwKCBvaCBuoaBt2xkYXA6Ly8vQ049amNwci1pbmZvLXJvb3QtY2EsQ049aG9t
ZXNydjAsQ049Q0RQLENOPVB1YmxpYyUyMEtleSUyMFNlcnZpY2VzLENOPVNlcnZp
Y2VzLENOPUNvbmZpZ3VyYXRpb24sREM9amNwcixEQz1pbmZvP2NlcnRpZmljYXRl
UmV2b2NhdGlvbkxpc3Q/YmFzZT9vYmplY3RDbGFzcz1jUkxEaXN0cmlidXRpb25Q
b2ludDCBwQYIKwYBBQUHAQEEgbQwgbEwga4GCCsGAQUFBzAChoGhbGRhcDovLy9D
Tj1qY3ByLWluZm8tcm9vdC1jYSxDTj1BSUEsQ049UHVibGljJTIwS2V5JTIwU2Vy
dmljZXMsQ049U2VydmljZXMsQ049Q29uZmlndXJhdGlvbixEQz1qY3ByLERDPWlu
Zm8/Y0FDZXJ0aWZpY2F0ZT9iYXNlP29iamVjdENsYXNzPWNlcnRpZmljYXRpb25B
dXRob3JpdHkwGQYJKwYBBAGCNxQCBAweCgBTAHUAYgBDAEEwDwYDVR0TAQH/BAUw
AwEB/zAOBgNVHQ8BAf8EBAMCAYYwDQYJKoZIhvcNAQELBQADggEBAIVO7RMK/44z
cWYAOJouT7oYnCiVdwvSXJ1pkAByabpdnVWUjjPkoHWRMXmbXnD14LwfmVgoTbGK
JYPRjfh82iM0ssYxDuSHL0hZgwm6x3nqNqLavEhoKOuiMS8z8LEVqrOY6asmMrDA
28SB9f1N4RST3g8Q2YD46zhKyfm+XjVAzYpgWLv1xT8Ig00sdUapjYj7Wa0qi/Bk
TAJrPPmwQyjSkiZNEgVBbHJ5O7DG3mM6W1ROcJbCpwNVYcKqfLs+Hodl20sBAAMm
FwWYccYxQzyGRDuNBJtcvhebTcVbuVklCsgZk+/w16lBYe/bBVo7g/YZxvuFPWxO
g/M7AHxaHHY=
-----END CERTIFICATE-----
Also, if we double click the file, we get Windows to open the certificate into Certificate viewer where we get the following:
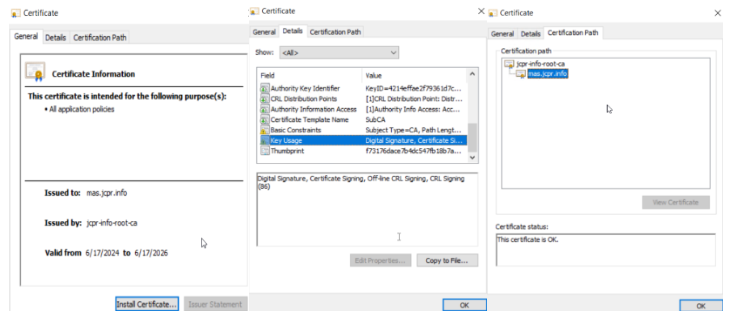
There are a couple of important points to check in the above screenshots, basically, check that “Certificate Signing” is listed under “Key Usage” and that the proper chaining is in the Certification Path by listing the “CA Certificate” as the “parent” certificate used to generate it.
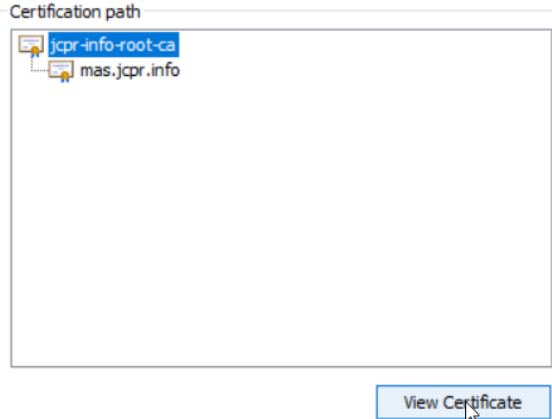
It is also useful to have the “root certificate” to be provided as part of the chain and to configure in OpenShift, so to extract it, just click on the “jcpr-info-root-ca” certificate under the “Certification Path” and then <View Certificate> as shown in the below screenshot:
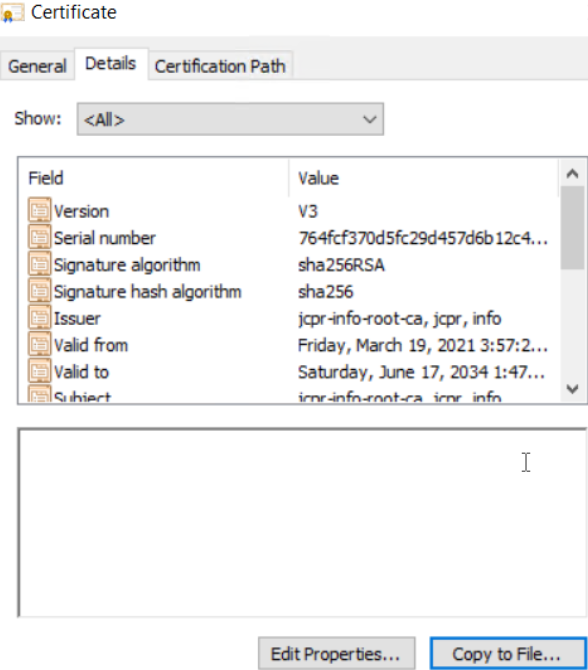
Next, once opened, go to the “Details” tab for the root CA and click <Copy to File…> as shown below:
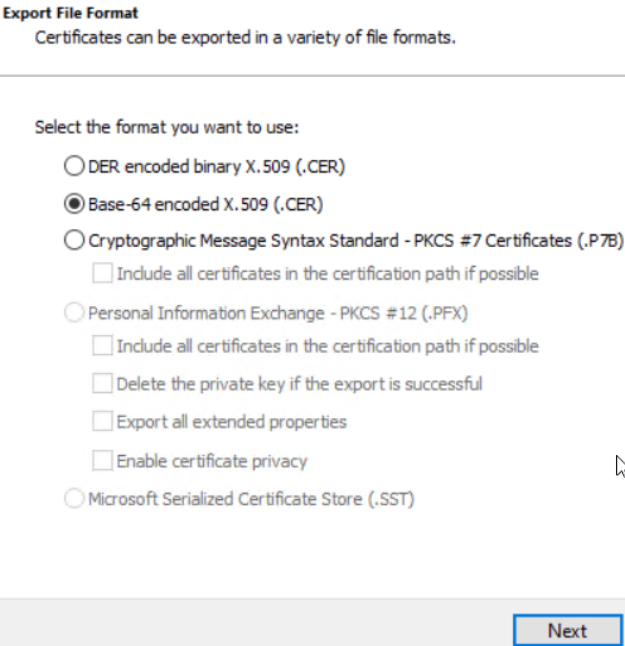
Once clicked <Copy to File…> the “Certificate Export Wizard” set of dialogs should appear, just follow it and ensure in the “Export File Format” step the “Base-64 encoded X.509 (.CER)” option is chosen as shown below:
Next, choose a file name to contain the results and after it has been generated, open it and note the contents, that in our case, are like below:
-----BEGIN CERTIFICATE-----MIIDkDCCAnigAwIBAgIQdk/PNw1fwp1FfWsSxDplLzANBgkqhkiG9w0BAQsFADBI
MRQwEgYKCZImiZPyLGQBGRYEaW5mbzEUMBIGCgmSJomT8ixkARkWBGpjcHIxGjAY
BgNVBAMTEWpjcHItaW5mby1yb290LWNhMB4XDTIxMDMxOTA3NTcyOVoXDTM0MDYx
NzE3NDczN1owSDEUMBIGCgmSJomT8ixkARkWBGluZm8xFDASBgoJkiaJk/IsZAEZ
FgRqY3ByMRowGAYDVQQDExFqY3ByLWluZm8tcm9vdC1jYTCCASIwDQYJKoZIhvcN
AQEBBQADggEPADCCAQoCggEBAMg+i0QIyte+Qv+s+CdXFIT9vQdh6XJcAtYxu521
GTDF8aJXorsLDxze1lcahcaIAQM9O3oM1TNw3Hyd0sdtTAaQI6Kv16EMnaCM9eiC
JVrQAkiPxpV2xfpdLHd68t84IkG1cW3sxqwYlAfAkHsAJzlPRhckGhxQb/2itQ+o
9AiacZQs0IC4RZk+ZLte81UclhVcACjfjRkGnQNPkD1XSSdTFEuIBCwoigRpTehi
jlJQIMz517fKEMwjokjDYYt17ufCymmc6vS9jMy9Ih3EDiBd9KaCZ0hT7kFWUNsz
p2MykTCaCja/tdbxtr5BPmSyh87OGBkmA9VznToiR+Lx3s0CAwEAAaN2MHQwCwYD
VR0PBAQDAgGGMA8GA1UdEwEB/wQFMAMBAf8wHQYDVR0OBBYEFEIU7/ri95Nh18J1
VtxFU/M7Dn/pMBAGCSsGAQQBgjcVAQQDAgEBMCMGCSsGAQQBgjcVAgQWBBRA8UMQ
bD6oAsa7jFwFyaPo8lw4YjANBgkqhkiG9w0BAQsFAAOCAQEAmMNMSr+O/mDs6+8j
zXR558r8lrEeiL8KSZ8oFEL5ZneNyhh7/duzDMK8slAt7MN//QCy6jgQHnPVADnK
vFgUYi/4WvKSARd32Z9QNCelL5EVJp5fvhDFkBvCc3nSyfyhjvhQ/u1F75ZhaHy7
rT4q6Hd65APwBnTbm0wbryBtHREIlxSTFqSMbXS9sPhOFPtF4bYkCNjZRi4hv8Hk
Vl0Ac5p51B1X7ScxbVR+Cl4HYT1CRU+5x8zmMkjK9ieWEyi+pTWvCOcfwunc6EBx
Ou8pFEejH+tQOJtXKRMPkfkqdtb74L2nHtkYOndvPMwy+9LekTc/2xNJkiZggZ5X
/dFE/w==
-----END CERTIFICATE-----
At this stage we should have:
1. The generated Intermediate Certificate Contents.2. The generated Intermediate Certificate Private Key.
3. The root Certification Authority Certificate Contents.
Notice that we could in theory generate from another intermediate and therefore the path to the root may be longer, but we are not going to cover such a case here. Also, the Certificate Signing Request has no use after the Certificate has been generated from it.
Next, we should create a standard OpenShift Secret on the same project/namespace where the Cert Manager Pods are running (in our case: “openshift-operators” for the JetStack Cert Manager or “ibm-common-services” for the IBM Cert Manager).
But first, we should encode the above certificates and private key and we are using the replacement values below for the encoded values:
- ${base64-encoded-value-for-the-intermediate-certificate}
- ${base64-encoded-value-for-they-private-key}
- ${base64-encoded-value-for-the-ca-certificate}
The values can be obtained by using “base64” encoding on the certificates by using a command like “cat cert.pem | base64”, assuming the content to encode is in the “cert.pem” file. Also, a website such as https://www.base64decode.org/ can be used as well.
To create we can use the (+) icon on the upper right corner of the OpenShift Console, or even the “oc” command line. Like the below:
kind: Secret
apiVersion: v1
metadata:
name: mas-jcpr-info-intermediate-ca-secret
namespace: ${CERT_MANAGER_NAMESPACE}
stringData:
tls.crt: ${base64-encoded-value-for-the-intermediate-certificate}
tls.key: ${base64-encoded-value-for-they-private-key}
ca.crt: ${base64-encoded-value-for-the-ca-certificate}
Notice the Secret name (in our case “mas-jcpr-info-intermediate-ca-secret”) can and should be modified to accommodate your preferences and situation. Any references to be it below (in the ClusterIssuer, for example) such use the correct name.
Once created, we can go to the Secret and ensure it has the proper values in the proper keys, using the <Reveal Values> icon. As shown in the partial screenshot below:
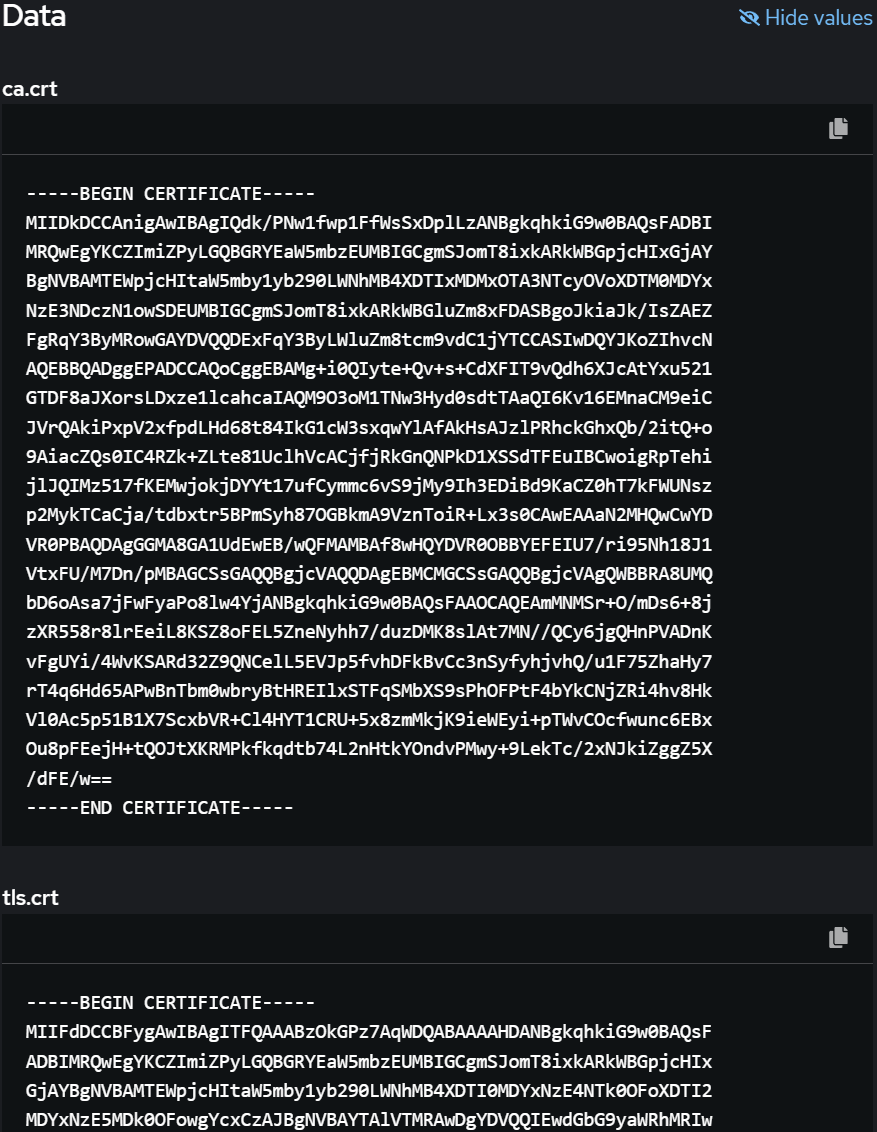
Ensuring the three keys “ca.crt”, “tls.crt” and “tls.key” all appear populated with the correct values.
Next, we are going to create a Cluster Issuer, by submitting it as in the below example:
apiVersion: cert-manager.io/v1
kind: ClusterIssuer
metadata:
name: mas-jcpr-info-ca-cluster-issuer
spec:
ca:
secretName: mas-jcpr-info-intermediate-ca-secret
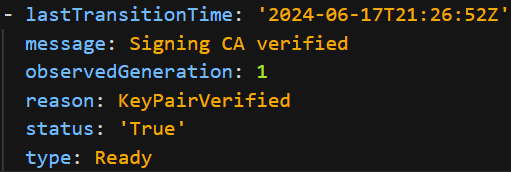
The submission of the above YAML should cause the Cert Manager to process it and it should populate its “status” section with a Condition of “type: Ready” reading “Signing CA verified”. Notice that we could also specify a Certificate Revocation List Distribution Point URL (as per the Cert Manager documentation URL stated above) but that case is not being covered. As per the below screenshot:
Next, to configure a specific MAS Core Instance to issue Public Certificates for their URLs, we should locate the “Suite” Custom Resource for the MAS Core Instance and add the following to their “spec” section:
certManagerNamespace: ${CERT_MANAGER_NAMESPACE}
certificateIssuer:
duration: 2y
name: mas-jcpr-info-ca-cluster-issuer
renewBefore: 360h
domain: dev.ocp01.mas.jcpr.info
Notice that the specified “duration” and “renewBefore” have been set to values that corresponds with the typical duration of the issued Certificates, in our case, 2 years. Also, ensure to use correct values for “certManagerNamespace” and “name” (as the Cluster Issuer name). Finally, the “domain” entry specifies the “base” URL for the MAS Core instance. All other URLs for the instance (and any installed or to be installed applications) will be derived from that “root” URL (and of course it must belong to the configured domain, in our case “jcpr.info”).
The above should be all the configurations we need to automatically issue and refresh Custom CA Certificates for our MAS Instances.
As a recommendation, we could also check that a valid Certificate gets processed and issued before we submit the MAS Core configuration. We could do so by creating a Certificate resource and watching the Cluster Events or going to the Cert Manager Controller Pod and watching its logs for any messages. Below there is an example of such Certificate for testing purposes:
apiVersion: cert-manager.io/v1
kind: Certificate
metadata:
name: test-wildcard-cert
namespace: default
spec:
commonName: 'tst.ocp01.mas.jcpr.info'
dnsNames:
- tst.ocp01.mas.jcpr.info
- '*.tst.ocp01.mas.jcpr.info '
issuerRef:
kind: ClusterIssuer
name: mas-jcpr-info-ca-cluster-issuer
secretName: test-wildcard-cert-secret
Notice that we should replace for proper values for the “commonName”, “dnsNames” and the Cluster Issuer “name” under “issuerRef”. Also, the “namespace” the Secret will be generated and the “secretName” that will contain the generated actual Certificate as well.
If everything goes well, after a while, the “status” section of the Certificate should be populated with a Condition of “type: Ready” reading “Certificate is up to date and has not expired”.
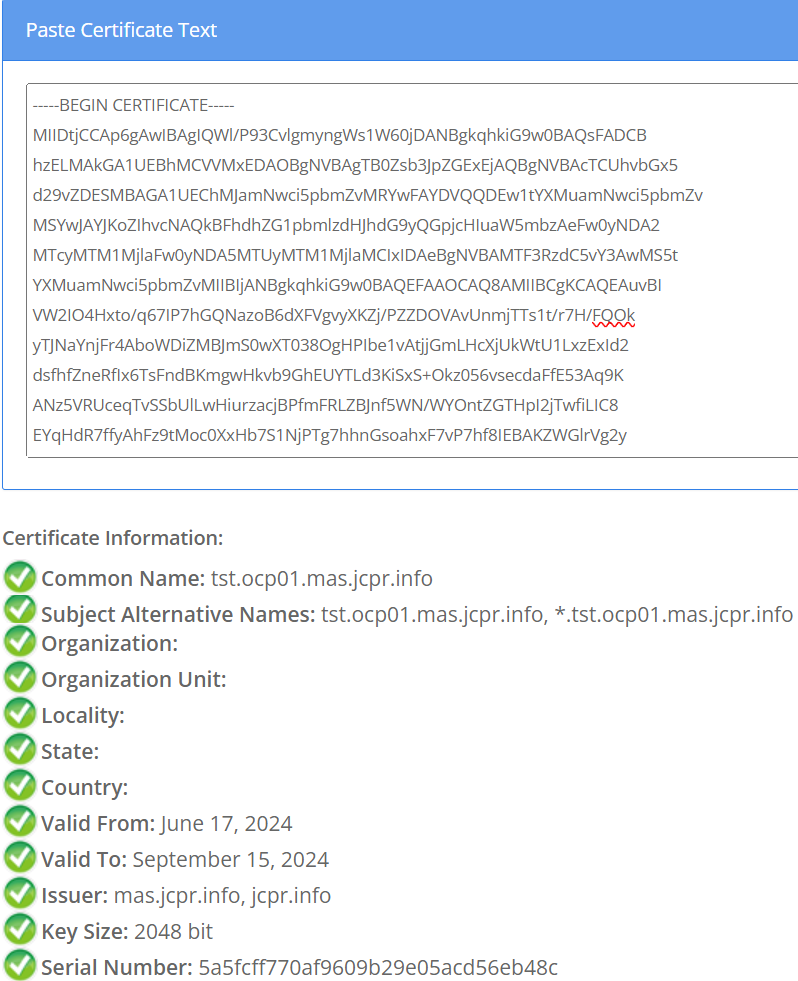
Also, we could check the actual Certificate contents by going to the related generated Secret (in our case “test-wildcard-cert-secret” in the “default” namespace) and looking for it “tls.crt” entry (if using the OpenShift Console, press the <Reveal Values> button first), then copying the contents and pasting in any online certificate decoder such as https://www.sslshopper.com/certificate-decoder.html.
Our next blog entry for the month of July will be about configuring Kafka queues in MAS Manage.

